Many thanks to Steve Cobb of Strode’s College for providing me with this excellent synopsis.
This account draws upon The Boer War, by Thomas Pakenham, first published in 1979, by Weidenfeld & Nicholson. It seeks, inter alia, to reassess, perhaps redress, the reputations of Buller, Roberts and Kitchener.
Background to the War
The Cape was originally settled by the Dutch East India Company, but was occupied by the British at the turn of the 18/19th centuries. British rule was confirmed in 1815 and settlement began. The abolition of slavery throughout the Empire in 1834 and a growing Afrikander (Afrikaner) discontent with the ‘biased’ laws of the Cape provoked “The Great Trek” of 1838, ending north of the Orange River (though most Boers remained at the Cape). Boer (Boer translates as ‘farmer’) conflict with Zulus ended for the most part after the victory of General Pretorius at the battle of Blood River in 1838. Boer settlement and concentration in Natal led to British annexation of the area in 1843. In 1848, the British defeated General Pretorius at Boomplatz. Soon after, the Transvaal (1852) and Orange Free State (1854) were confirmed as independent by the Sand River, and Bloemfontein Conventions, respectively.
The British approach for much of the 19th Century was, for the most part, indecisive, but there had been three attempts at a ‘forward’ (read expansionist) policy (most of these policies failed, however, because of lack of support or changes of government in Britain):
1. Sir Harry Smith in the late 1840s;
2. under Sir Benjamin D’Urban in the 1830s and;
3. in the late 1870s, when British troops occupied Pretoria, and provoked the Zulu War of 1879 (the Battles of Isandhlwana, Rorke’s Drift and Ulundi, under Sir Garnet Wolseley) in order to extinguish the Zulus as a military force. The Boers subsequently rose under Kruger, and defeated the British at Majuba Hill. (First South African or First Freedom War). Hill Self-government was restored to the Transvaal and Orange Free State, though Britain reserved ultimate control over foreign affairs, as ‘paramount power’ in Southern Africa.
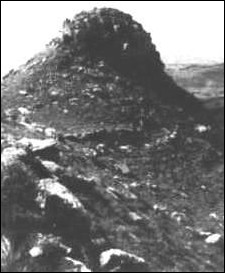
Majuba Hill
The Origins of the War
1. Manipulation by Sir Alfred Milner (High Commissioner for South Africa and Lieutenant-Governor of Cape Colony) of the British Government (P.M., Marquis of Salisbury; Colonial Secretary, Joseph Chamberlain), which, while it wished to assert British domination of South Africa, did not want war.
2. Provocation of the Boer Republics (Transvaal, under Paul Kruger; Orange Free State under Marthinus Steyn) by Milner, which had limited independence under the Pretoria Convention of 1881, and London Convention of 1884, following the First South African War of 1880-81.
3. The ‘Gold Bugs’, Rhodes and Beit, wanted the mineral wealth of the area incorporated into the British Empire; Kimberley had been annexed to Cape Colony in 1871. Rhodes (with the tacit approval of Chamberlain) organised the Jameson Raid (1895/96), an attempt to provoke an uprising of Uitlanders (non-Boer immigrants) in Johannesburg to secure political rights, and thus out-vote the Boers in their own Republic. The ‘raid’ envisaged a three-day dash from Pisani & Mafeking, to Johannesburg before the Boers could organise to prevent it. The ‘raiders’ were 400 Rhodesian Police, & 120 volunteers – led by ‘Dr Jim’, (Leander Starr Jameson), Administrator of Rhodes’ & Beit’s Chartered Company (which ran Rhodesia for the Crown). No uprising took place in Johannesburg, and the raiders were captured at Doornkop, within a couple of hours ride of Johannesburg. Jameson took the blame, but Rhodes was forced to resign as Chairman of the Chartered Company, and as Cape Prime Minister. Kruger assumed hero status overnight, and was elected to a fourth term as President in 1898.
“The Jameson Raid was the real declaration of war in the Great Anglo-Boer conflict. And that is so in spite of the four years truce that followed [the] aggressors consolidated their alliance the defenders on the other hand silently and grimly prepared for the inevitable.” Jan Smuts, 1906
Milner negotiated for Uitlander rights on behalf of Chamberlain, with Kruger at Bloemfontein, (May/June 1899). Milner engineered the collapse of the talks, precipitating an ultimatum by the Boers.
Chamberlain and the Government agreed to an expeditionary force to fight a ‘small’ war which, supposedly, would be over “by tea time” – misled by Milner and the “goldbugs” into believing that a small show of force would call Kruger’s bluff and prevent war, whereas they planned to provoke a war, and consequently annex the two Boer Republics. Chamberlain and Kruger understood each other only through Milner, who had a vested interest in misleading both; thus, the compromise that both wanted was lost.
Most residents of Cape Colony were Afrikaners. After the collapse of Rhodes’ Government (in the aftermath of the Jameson Raid), the Colonial Government became mildly pro-Boer. Milner then became worried about uprising in Cape against British rule.
A Background to Whitehall and the Military Establishment
The British military establishment was vastly inferior to the naval (in size and prestige) at the turn of the century and was split between adherents of the “African” and “Indian” ‘rings’, so named because of their principal theatres of operation:
“Africans”:
Sir Garnet Wolseley, C-in-C,
General Sir Redvers Buller, Commander 1st Army Corps, Aldershot (a favourite of the Queen)
“Indians”:
Field-Marshall Lord Roberts, C-in-C, Ireland
Major-General Sir Penn Symons, GOC, Natal
Lieutenant-General Sir George White, Quartermaster-General at War Office.
The Secretary of State for War, the Marquis of Lansdowne, (ex-Viceroy of India), sided with the “Indians”, resisting Wolseley’s Army reforms, running the Army on a shoestring, and keeping the size of the Expeditionary Force down. The Army had only 70,000 men available for foreign service, and was seriously below strength in artillery and cavalry and short of essential supplies of every type.
The British had waged war ‘on the cheap’ for fifty years. There had not been more than two engagements where they had lost more than 100 men since 1857. They had been, essentially, small wars against disunited and ill-armed African and Indian tribesmen. Often these had begun with shattering reverses; small bodies of men (Isandhlwana, Gordon in Khartoum), surrounded by tribal warriors who gave no quarter, and who had fought to the last cartridge. In due course the main British army had come on the scene, and inflicted a crushing and permanent defeat on the enemy. By European standards, such actions involved little tactical or strategic manoeuvring. Rifles against spears: 15000 dead at Omdurman, in 1898, (although Kitchener casting the bones of the Mahdi in the Nile, and speculating on the possibilities of using his skull as a drinking cup, had caused a political storm at home.)
Hence, the Boers were not regarded (except by Buller) as a serious military adversary, in spite of the British defeat at Majuba Hill (27 February, 1881). There was no serious knowledge sought of the South African terrain and despite the fact that the War Office had consistently ‘sniffed’ at the military threat of the Boer Republics, by the outbreak of hostilities the Boers had thousands of modern, rapid-firing Mauser rifles (using smokeless charges), a number of field guns and 4 Creusot “Long Tom” cannons.
The War
British troops gathered from United Kingdom, the Mediterranean and India, initially totalling 15,000. The initial force was placed under General Sir George White, to be followed by the main force under General Buller. Latter had argued that the British forces should dig in on the Tugela River, and not advance into Northern Natal, in case it was cut off by a Boer invasion. Buller planned to concentrate the Army, sweeping north to Bloemfontein from the Cape. White thought Buller alarmist. Only when travelling across South Africa to Durban did White realise the nature of the terrain (as an “Indian”, he had no knowledge of Africa), and learn that Symons had taken forces north of the Tugela: White was the wrong choice as commander, Symons had pushed the troops too far forward, and the reinforcements were wholly inadequate.
Initial British tactics relied on the transportation of troops and supplies by train, the use of armoured trains for reconnaissance and patrols, and the expectation that conflict would take the form of the set-pieces practiced at Aldershot. They were sadly mistaken. Troops for the first part of the war were limited to movement about 8 miles either side of the railway, since they were supplied with far too few horses, or oxen to match Boer mobility. There were also a number of Uitlander irregulars attached to the British Army. Boer tactics were to defend their territory through aggressive defence, using mounted infantry (burghers on horseback with Mausers); inviting the British to storm hidden defensive positions (river banks, kopjes) at great cost. The spade was to become the Boers’ secret weapon.
The Boers invaded Natal with 4 columns, and met Symons at Dundee [20/10/99]. This was a tactical victory for the British (the khakis)…at the price of some surrendered cavalry, and the death of Symons himself. The next day White was present for further success at Elandslaagte [21/10/1899], involving a cavalry charge by the 5th Lancers & 5th Dragoon Guards, which turned the veld into a butcher’s shop:
“Most excellent pig-sticking for about 10 minutes, the bag being about 60”
(Officer quoted in Times, 13/12/1899).
Notwithstanding this, White was forced to withdraw in a forced march to Ladysmith, the principal British base in Natal, to avoid being outflanked by the Boer columns. Having done so, he found himself surrounded and besieged (2/11/1899) (as were Kekewich & Rhodes at Kimberley; and Baden-Powell at Mafeking.) Buller’s fears were confirmed: White was cut off north of the Tugela. To rescue him (and then sack him) would require splitting the Army (when it arrived in South Africa, delayed for 4 months by Lansdowne’s caution), and crossing the Tugela, a natural defensive position from either side. Sacrificing Ladysmith was politically unacceptable (many in Britain felt that the fall of such a landmark British South African city might precipitate rebellion in other parts of the Empire, particularly India).
The “imperial steam-roller” began with an attempt to relieve Kimberley. Methuen after engagements at Belmont (23/11/1899), and Graspan (25/11/1899) crossed the Modder River (28/11/1899), but was held at Magersfontein (11/12/1899). In the East, Buller moved up to the Tugela, to secure the relief of Ladysmith. In the same “Black Week” as Magersfontein, he failed to cross at Colenso (15/12/1899) (audible from Ladysmith), and there was a bloody stand-off after crossing a few miles upstream, at Spion Kop (24/01/1900), and then retiring. Colenso gave Lansdowne the excuse to appoint Roberts, who landed in Cape Town on 10 January, as G.O.C. South Africa, with Kitchener as Chief-of-Staff. Buller, who retained command in Natal, turned the Boer trenches at Colenso on 18th/19th February, crossed the Tugela and after further bloody actions against Boer positions, relieved Ladysmith on 28th February 1900.
300 miles to the west, Methuen was demoted and Roberts crossed the Modder River. After histrionics from Rhodes, Sir John French relieved Kimberley on 15th Feb with a 10-mile cavalry charge – killing most of the 5000 horses – Britain’s only large mobile force in Africa! De Wet captured 200 of Roberts’ supply wagons at Waterval Drift on the Riet River, the same day. Roberts caught Cronjé at Paardeberg (18/02/1900), where Kitchener recklessly wasted lives on a frontal assault, whose effect could have been achieved with an artillery barrage. On 27 Feb (the 19th anniversary of Majuba), Cronjé surrendered to Roberts with 4000 men – the first great British victory of the War. French allowed Kruger and 6000 Boers to escape at Poplar Grove, on 7 March, and captured Bloemfontein without a shot, on the 13th.
While he had let Kruger escape, in capturing an abandoned Bloemfontein, Roberts made the miscalculation that the Boers were demoralised, and that the war was virtually over. His troops ‘sat down’ in Bloemfontein, and succumbed to typhoid, in part due to supply problems. Roberts had never appreciated the supply needs of modern warfare, and had abandoned the modernised Army supply arrangements of Wolseley, without putting much in their place.
The Boers were indeed demoralised, but De Wet offered a new strategy: attacking British communications with fast mounted commandos, unencumbered by the supply columns which had previously given each Boer campaign the character of the “Great Trek”, and had proved the undoing of Cronjé at Paardeberg. Within 3 weeks of the fall of Bloemfontein, he had made his point (Sannahs Post, Reddersberg & Wepener, Mar-Apr 1900), though with only a small proportion of the Boer armies, he delayed rather than halted the slow trek north of Roberts’ 50,000 ‘Grand Army’ towards Pretoria.
“Practically Over”
Roberts detached a column under Colonel B. Mahon to relieve Mafeking, an event which was greeted with hysteria in Britain.
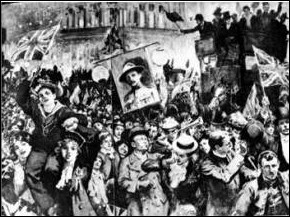
Mafeking Relieved!
Mahon, whose force included Jameson’s 2nd and 3rd-in-command from the ‘Raid’ in 1895, marched 240 miles from the Vaal in 12 days, linking with Lt-Colonel H. Plumer’s Rhodesian Column. Baden-Powell ended the 217-day siege with a magnificent reputation (which may not have been deserved), and food supplies to spare. In keeping with the mutual determination to keep it a “White Man’s War”, Baden-Powell had given much of the besieged African population the option of “Leave here or starve here”. Large numbers left and starved on the veldt anyway.
Roberts received the surrender of Johannesburg on 31 May 1900, after a brief armistice which exchanged the safety of the Rand mines for Louis Botha’s right to withdraw his army intact. Allowing this army to escape was a serious strategic mistake by Roberts, but at the time it seemed humane, and understandable. The important thing was to secure the mines for the ‘goldbugs’. (The new civilian administers of British Johannesburg were Uitlanders, whose main motive was to get production restarted, and cut the wages of black labour.) Roberts’ armistice with Botha, and further delaying tactics kept him outside the city. This gave Smuts time to extricate all the war materiele, as well as gold and coin from the mint: armed burghers left by train, and Kruger left for ever. Roberts took Pretoria on 5 June 1900, still anticipating a formal surrender, and a cessation of arms! It was not until 10 June that he discovered his mistake. At the battle of Diamond Hill/Donkerhoek, (11/12 June 1900) Botha was driven off to the east, but the Boer armies had rediscovered their spirit after the loss of the capital. This had been the Boers lowest moment, until rallied by Steyn and De Wet. The simple Biblical certainties, and grim determination of the ‘sheep-and-cow’ Republic Boers from the OFS (now the “Orange River Colony”) stiffened those of the “mineral” Republic, which had been initially the firmer of the two. This was to be the pattern until the end of the war, with De Wet leading the ‘bittereinders’. The armies of the two republics separated, with De Wet free to commit his forces to guerrilla warfare. In the week when 3000 prisoners were released in Pretoria, Boer commandos captured another 1000 in raids on Lindley and Roodewal. In the Eastern Orange River Colony, Lt-General Sir Archibald Hunter trapped the Boer armies in the Brandwater Basin, securing the surrender of Prinsloo, two other generals and over 4000 men, by early August 1900. However, De Wet and Steyn escaped, as they were to do again from Hamilton, when they could have been caught at Oliphant’s Nek, a few days later. Roberts moved east from Pretoria, to link with Buller moving up from Natal, in order to sweep the Boers into Portuguese East Africa. At Belfast/Bergendal, on 27 August 1900, Buller defeated Botha in the last set-piece battle of any size in the war, following which the Boer army fragmented, pursued by three different British columns, though with few casualties on either side.
Buller himself was recalled home, receiving a hero’s welcome, but little else other than the command at Aldershot. Roberts returned in January 1901, to an Earldom, £100,000, and appointment as C-in-C, leaving Kitchener in command. In October 1901, Buller was taunted by an anonymous letter in the Times ( from Leo Amery, a protégé of Roberts), which accused him of having telegraphed White to surrender Ladysmith early in the siege. Buller was forbidden to release the true text of the telegram, but blurted it out at a dinner at which Amery was present. Buller was then sacked for indiscipline on Roberts’ insistence. The ‘Indians’ final triumph over the ‘Africans’, cemented by Amery’s magisterial and polemical The Times History of the War in South Africa, (7 vols., 1900-1909)! No prizes for guessing heroes and villains.
The Unionist Government in London was one whose governance was generally well-regarded, and it had come in for a great deal of criticism over its handling of the War, however, the issue of the war itself had split the Liberal opposition into three (radicals, moderates & imperialists), with their Leader, Sir Henry Campbell-Bannerman, quite unable to unite them. Salisbury therefore seized the moment to call a General Election in the Autumn of 1900, and gained a majority of 134 over the Liberals and Irish Nationalists, though the votes in the country in this “Khaki election” were more evenly balanced (2.4:2 million). The new War Minister was Sir John Brodrick, a confidant of Milner, to whom the latter wrote, criticising Roberts, and denying that the war was nearly over:
“The fatal error is not to hold district A & make sure of it before you go on to district B The consequence is we have a big army campaigning away in the front & the enemy swarming in the country behind it But it is no earthly use dashing about any more when there is nothing to get at the end of the dash – the time for over-running is over stage 2 is a gradual subjugation, district by district, leaving small entrenched & well-supplied garrisons behind your columns as they sweep the country & mounted police to patrol between these posts.”
(Letter, 5 November, 1900)
Naturally, Buller received absolutely no credit for having expressed similar ideas earlier.
Kitchener’s War
Roberts thus far had pursued a “velvet glove” policy: a Proclamation of 31 May offered amnesty for rank-&-file rebels under certain conditions, while promising deportation for leaders who surrendered. But the obvious civilian support for the republican armies had led him into tacit approval for burning farmsteads suspected of assisting “rebels”, e.g. by Hunter’s troops in the Eastern ORC. Milner had shifted in favour of seeking “unconditional surrender”, once the Rand mines were secured. Politically, Milner wished to convert all but the Boer leadership into peaceful citizens of the Empire; he feared the consequences if the war dragged on with the prevailing levels of destruction to property; however, he feared the ‘wrong’ sort of peace even more – some sort of botched “kaffir bargain” with the Boer leaders which preserved the separate identity of the volk. Kitchener, on the other hand, wished to end the War quickly, but had no immediate idea how to do so. Intermediaries were sent to carry the message that the status of the Republics as part of the Crown was non-negotiable, but otherwise, peace was there for the offering. Both sides met at Middelburg, in the Eastern Transvaal, on 28th February, 1901. Kitchener’s terms included an amnesty for rebels, compensation for property destroyed, eventual self-government, and no franchise for blacks before self-government. Chamberlain, in London, jibbed at the latter, as one of the war aims in 1899 had been declared to be the protection of the native population. It would be unacceptable for the black population to be left in the same position as before the war, with not even the limited rights (which “preserved the just superiority of the whites”) enjoyed in Cape Colony. This, together with the watering down of the amnesty, at Milner’s behest, resulted in Botha rejected the terms in mid-March.
On the Boer side, the tactics were now almost entirely defensive: to string out the conflict until the British tired of it, combined with the invasion of Natal and Cape Colony (whose farms couldn’t be burned), and attempts to raise support from Afrikaners in Cape Colony. British control of the Boer territories was perilously dependent on a few railway lines, alongside which their supplies were stored, and along which they moved. De Wet’s tactics were to raid these and destroy them, or small detachments of British forces, with relatively small numbers of men carrying ammunition and food for about a week, unencumbered by baggage trains. This tactic proved successful for Smuts at Nooitgedacht in December 1900.
Kitchener’s idea was to sweep through the republics, rounding up guerrillas, in the “bag”, rather like shooting grouse or pheasant, and depriving them of any sustenance: horses, cattle, sheep, women & children. But what would one do with the civilians? Here there was a double need: to protect the wives and children of Boers who had surrendered (Botha, Smuts and De La Rey had made it official policy to drive them from their homes); and to clear the families of the guerrillas. Placing them in large laagers close to railway lines, run on military principles, a skeleton civilian staff, with reduced rations for the inmates. Meat wasn’t issued to families of guerrillas; there were no vegetables, or fresh milk for children. The diet was poor enough to facilitate the spread of disease. For Kitchener, this was big, ambitious, simple and cheap: he was uninterested in the details. The camps weren’t supposed to be comfortable: this was a war. He wanted to win it quickly. To that end, he also proposed to string lines of cheap forts (“blockhouses”) along the railway lines (patrolled by armoured trains), and across the country, linked by barbed wire. Into these wired-off areas, the Boers would be swept into the “bag”. Kitchener had thus adopted Milner’s (and Buller’s) ideas, expressed in November 1900. Kitchener regarded Milner as the villain of the Middelburg talks, and perceptively advised the British Cabinet, in mid-1901, that his ‘vindictive’ desire for unconditional surrender would prolong the war. Even if that is what they wanted, they would still have to make a generous peace with the Boers. South Africa was a “white man’s country”, and British settlers would have to share it with the Boers. Britain would eventually have to give self-government to white South Africa, just as they had to the other white dominions of the Empire.
The Concentration Camps, whose full horrors were revealed by Emily Hobhouse, a Liberal, and subsequently corroborated by the impeccably establishment Millicent Fawcett, were to become Kitchener’s legacy in South Africa; together with the blockhouses manned by tens of thousands of Empire, and increasingly African, troops. This was not a “white man’s war”: Africans played a central role OF non-combatant support for both sides; those manning the blockhouses were armed, a fact which increasingly worried the Boers. In general, it was the restraint of the Africans which is noteworthy, particularly given the way they were treated by both sides; armed Africans were shot.
“Of all who have suffered by the war, those who have endured most & will receive least sympathy, are the Natives in the country places of the Transvaal they have welcomed British columns & when these columns have marched on they have been compelled to flee from the Boers, abandon most of their cattle & stuff & take refuge in the towns or fortified places, or be killed. I have been asking after my people & this is the account I get of them all For instance, at Modderfontein, one of my strongest centres of Church work in the Transvaal, there was placed a garrison of 200 (white) men. The Natives – all of whom I knew – were there in their village: the Boers under (General Jan) Smuts, captured this post last month & when afterwards a column visited the place they found the bodies of all the Kaffirs murdered and unburied. I should be sorry to say anything that is unfair about the Boers. They look upon Kaffirs as dogs & the killing of them as hardly a crime.”
Canon Farmer, a leading British missionary in the Transvaal. Letter, dated 29/03/1901 (quoted by Pakenham, p 573)
Smuts is remembered as one of the more high-minded commando leaders! By the end of the war, Africans were exhibiting less restraint: in May 1902, Zulus repaid an insult from local Boers by attacking Holkrantz, near Vryheid, and killing over 50. By April 1902, the British had the upper hand, due to their adoption of Boer fighting tactics, and increasingly good (African) intelligence. Kitchener reversed the policy of the camps, and left the guerrillas to deal with the well-being of their own wives and children, in a desolated landscape of burned farms and slaughtered livestock. The Boer cause faltered as many realised that the Cape Afrikaners would never join them, and indeed thousands enlisted against them: at the end, one-fifth of fighting Afrikaners, were fighting for the British!
At the peace of Vereeniging, May 1902, the terms were essentially those of Middelburg over a year earlier, excepting a reversal of the insistence on limited black rights; effectively postponed forever (or at least until 1994!) The British military leadership had begun to see through Milner’s grand strategy, and guessed that his imperial vision essentially meant handing South Africa over to “loyalists”: the Uitlanders and the ‘goldbugs’.
Consequences of the War
1. The Union of South Africa, at a price: the loss of already tenuous Black rights;
little or no British immigration;
the eventual civil and political domination of the Afrikaner descendants of the bittereinders in 1948 and Apartheid, until 1994.
2. The death of the set-piece battle and the lengthy domination of cavalry.
3. The end of “splendid isolation”: The British had found themselves isolated diplomatically during the war and began to look for ‘friends’, resulting in the Anglo-Japanese Treaty of 1902 (a recognition that Britain was over-stretched, and unable to police all of the oceans within the Empire), allowing Britain’s capital warships to withdraw to Home Waters as the race for Anglo-German naval parity began in earnest, and; the Ententes Cordiale, 1904 and 1907.
4. The Liberal Government’s (1906-14) Welfare program (the War had provided a picture, in stark relief, of the reality of the British Army’s creeping adaptation to the 20th Century: there were simply too few fit adult men available to British forces.
5. Britain’s pre-Great War program of martial aggrandisement.
© Steve Cobb, Strode’s College, 1998
Changes © Robert Wotton, South African War Virtual Library, 1999-2001.
